samedi 30 juin 2012

Make-Up Tips for your skin, lips, eyes and cheeks.


Tips for skin


master the basics
The best thing you can do for your skin is to to take care of it. Treat it like the finest piece of silk you own. We'll show you how.
secret to a natural, flawless look
Ever wonder how to get that natural flawless-looking skin? Here we share our secret to a dewy, flawless complexion.
hide imperfections
A little concealer goes a long way! We have the tricks to hide those unsightly imperfections. Easy does it!
all-day flawless finish

Give your face a velvety, natural finish, and keep your makeup lasting longer! We'll share what we know about setting your flawless finish straight.
 

Tips for eyes


the sophisticated look
Want fresh, dazzling-looking eyes without all the cakey makeup? We show you how to create an effortless sophisticated look and how to apply eyeliner.
elegant, dramatic eyes
Spice up your night and create a gorgeous nightime dramatic look - quick and easy!

natural-looking eyeliner
On the run? Apply natural looking eyeliner quickly and professionally. No fuss – simply amazing!

brighter, wider eyes
Want a real eye-opener for a clean, fresh wide eyed lash look? We share our eye-opening secret!

well-defined, well-groomed brows
Eyebrows give expression to your face, so frame your eyes with a classic and becoming eyebrow shape.


tips for cheeks


creating a natural, rosy radiance
When applying blush, you want the color to look soft and natural, as if it comes from within. Read below for tips on how to put on make-up.

1. Tap or lightly blow on the applicator brush to remove any excess blush before applying to prevent a harsh and uneven application.
2. Apply your blush on the apple of the cheek and carefully blend towards your natural hairline.
3. If you have two shades, apply the darker one on the apple of the cheek first, then use the lighter shade to highlight. Blend well so there is no visible line between colors.
4. Highlight your temples, forehead and chin.

A-Tip: To know "where to glow" bend over for 30 seconds, then slowly stand up. Where your cheeks are flushed is where you are meant to blush. Apply your blush there and it will be naturally rosy every time.
B-Tip: Cheek color should be used to enhance your complexion, not to change your natural skin tone. Use sparingly for daytime, then add more or a deeper shade for a more dramatic nighttime effect. For special occasions, dust a lightly frosted powder over your cheekbones for a subtle but alluring glow.
C-Tip: Make sure to blend your blush into your foundation well or it will tend to look unnatural and add the appearance of 5 years to your looks.

Tips for lips


shape up your lips
Lining your lips is important for creating plump, noticeable lips. We'll share our lip lining technique that's as easy as 1-2-3! Learn about how to put on lipstick.

perfecting your pout
What effect are you looking to achieve? Creamy? Sheer? Glossy? We'll show how to perfect your pout!

smooth, soft, and supple
Attractive lips are soft and supple, so keep your lips smooth! The key is the right balance of care and conditioning.

Topic: Eyelash Makeup Tips

Hi,

I keep little folders with all sorts of weird beauty tips and I found my eyelash tip notes last nite and through I would share. I hope you all will jump in and add yours.

1. Thicken lashes by layering

My makeup consultant friend told me to layer clear mascara between colored layers and that will add more thickness w/out gloopiness. I tried it and it works.

Or you can start with a pre-mascara base coat that will help add thickness from the bottom up. My friend used to recommend Origins which has some product called Underlash or maybe it is Underwear or something like that? Anyway, this was a new trick.

Apply each coat and let completely dry...using your mascara toothbrush to remore clumps inbetween.

I always limit to 3 layers or else it feels like "too much" but judge how many layers you feel most comfortable with.

2. Make eyes pop

Try tipping your lashes with a dark color to match your eyes to make eyes pop. You can use midnight blue or navy colored mascara for blue or blue/green eyes or experiment with different shades to alter the impact. You can also try framing your eyes with the color mascara and then tipping the ends of the lashes with black.

3. Avoids clumps

Apply mascara in left to right strokes to get full coverage but avoid clumping.

4. Use a Mascara with a "mini" brush to get smudgeproof color on lower lashes OR you can use an eye shadow brush that is smaller and less likely to smudge than a regular brush.

5. Use a small plastic ruler to "anchor" your eyelashes as you apply the mascara. This will help give you leverage to apply mascara to every single spot on your lashes. It sounded weird the first time it was recommended but I tried it and it really works. I also used my building access key once in a pinch and it worked as well.

6. Try adding a touch of eyeshadow powder inbetween mascara layers to add thickness. I tried this once with a dark brown eyeshadow powder and then added brown mascara over the top. It actually made my eyelashes look and feel a lot fatter.

Hope these help and I hope you will all try yours.

So, what's new makeup trends for 2012 ? It's all about glamor...


By Sharon Stajda,

The newest trend in makeup for 2012, in three words ,"sexy and sophisticated" and is universal to all women. The key to pulling off these looks, have confidence... The five hottest trends for spring and summer 2012 hot off the runways - are liquid eyeliner, orange red or floral shades of lipstick, the trend in eye shadow hues are all about metallic, shiny and bold! The strong well manicured brows is still holding its own. Oh, I almost forgot, stronger hues of blush has made a real big comeback!


Do you use makeup? I admit it, I do, and have for a very long time... I would not call myself a makeup snob, but after many years of using makeup I have come to the opinion that some of the brands that cost a bit more are just better.
When I started using makeup as a young teen, I didn't care about which brands I used. Actually I didn't even know about higher-end cosmetics, due to my age.  Well, as I became a young adult it all changed. After entering the work world I was exposed to so many women, all having favorite makeup brands, some more costly than others?
 My initiation was swift, before I new it I was buying the more expensive brands of makeup. Over the years I have tried so many brands, it would be hard to list them all.I have come to the conclusion that the more expensive brands do have an edge over the cheaper brands. I do still have cover Girl, and Revlon favorite though.
 I have many girlfriends that disagree with my fetish for top end cosmetics. Some thinking it is ridiculous to spend so much money on makeup, I have to constantly defend my need for top brand cosmetics. In the same breath I have to say, I have friend that shop only the drug store shelves for cosmetics, and seem to look wonderful with their cheaper brands cosmetics.
I have a saying "if a bit of high end makeup makes me happy, why should it matter to anyone else? " I would also point out, many that criticize have not tried the better brands of cosmetics to  actually compare.
Everyone has their favorite makeup brand, I can't help it I have so -- many...I have added a few of my favorite brands of cosmetics below, along with some of my tried and true products from each popular cosmetic brand.I hope you will take time to add feedback below, and perhaps share a few of your own tried and true beauty products.

Smart Chicks Seasonal Trends...

2012 Is Here, And The Trend In Makeup - Sexy, Sizzing, and Dramatic ! No More Peach's And Cream... 

type=text
Ajouter une légende


The makeup trends for the summer of 2012 is a bit on the dramatic side... Lips are berry
stained or sheer glossy orange, either look is sexy and sizzling! Foundation is slightly more matt, saving the cheek area for a bit rosy hues. Eyes are where the drama sets in, yes the trend of the heavier lined eye is sticking around for summer. The shadows that are on trend for this summer are hot, and from sensuous teal to golden metallic, and creamy neutral shades, and smoky grays... All the attention is on the eyes this summer. The cheeks are being played up big time, oh yes blush is so back in a very big way! Choosing a blush should be determined by your skin tone, cool, warm, and all that... For the cool skin tones use a deep rose or a bronzer that has pink or rose tone in it. For the warm toned girls, stick to blushes and bronzers that have a peach tone or light brown tones in them. The secret to using blush is blend, blend and blend again...

I have added a few wonderful beauty picks just below at "A Smart Chick On A Budget" . Item's that ave been reviewed in some of the leading Fashion Magazines.

Recipe For Actress "Scarlett Johansson" Look

Ingredients

  • Foundation
  • Cody Tranclusant powder
  • black eyeliner
  • eye shadow Soft gold metallic
  • and smokey gray
  • black mascara
  • lip stain with soft berry tones
  • Burt's Bee Lifeguards Lip Balm
  • cream blush rosy tone

Instructions

To clean face apply foundation, set with light touch of power. Line eye top and bottom lid with black eyeliner. At top lid cover lid with a soft gold metallic eye shadow, at corner of the eye use eye shadow brush and brush just the corners of the eye with a soft metallic gray shadow, blend with finger toward the gold shadow, blend only 1/3 of the lid towards the gold shadow. Apply mascara.

Lets do the cheeks now ! Add a very small amount of a cream blush, peach in this case... Blend the blush into the apple area of your cheek. Time to add some drama! On a small powder puff add a very small amount of bronzer, lightly brush under cheek bone with a motion that is headed toward the ear blend well with finger, now brush the puff at each side of your nose, blend a bit with you finger. We are not done yet, now brush the puff at the protruding part of your chin, and blend in with your finger.

 
Time to put some color on those lips. Use a stain that has a pop of orange... Let the stain dry well, then add a coat of clear lip gloss or Burt's bees lip balm with bees wax...

Red lipstick is considered an all time classic when it comes to lip color... And it's so on trend this season ! 


vendredi 29 juin 2012

Makeup & Beauty Tips


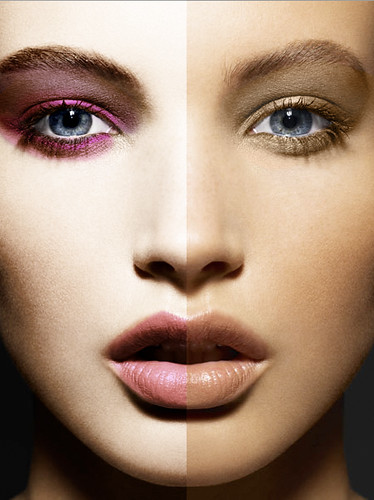
Makeup Tips to Look Beautiful

         Sometimes our everyday makeup is just not enough and evenig makeup is too much. Perhaps we need to correct a situation, want something special to get married in, or something that won't make our eyes look insect like behind glasses. The great thing about makeup is it is adaptable and helpful - if you've got a beauty issue, makeup can be of assistance.

We are load to prescribe certain looks for certain ages. Yes, we have heard those rules that say teenagers should wear only lip gloss and grandmothers should stick to subdued shades, but we think a lot of what makes each of us beautiful is our uniqueness, and this often comes through in the makeup we like to wear. That said, we will provide you a few general age-related guidelines, which you can choose to follow or ignore depending on your tastes.


Makeup Tips - Applying Makeup Tips - Excellent and Professional Makeup Tips


For natural-smoky look, whatever colour your eyeliner pencil is smudge it in tiny circular motions. Give yourself a start with a few ice cubes pressed on your skin for a finishing natural glow.

Always begin with the base, concealer, brows eyes, nose, lips, and then extra's, (i,e start from base, top-bottom). Never use bold pencils for anything, always sharpen for two reasons 1 fast build up of bacteria on tip, 2 wont give any natural definitiion to your finished look, only and Only use bold pencils after running pencil in hot water for a deeper or smudgey look.
 
For accentuated lips, begin with pencil, lipstick, gloss if needed, then pencil again, blot lips, then lipstick again. Comb brows upwards before plucking or colouring in for tweezing the bottom, then cob downwards to tweeze on top. Finish your look with loose powder to soften your look and then spray hairspray into air and walk into it for a long lasting stay.


Never sleep in makeup, mascara, concealer, lipstick, or eyeshadow! just wash face even if its with water only. For a casual-day look, forget the shimmery powders, rich lipstick, go for glosses instead and pressed powders. use a mossy light green pecil or shadow over your eyelids and ivory under your brow. For an evening out, only deepen you your colours, switch from gloss to rich moisturizing lipsticks and from powders to "sticks".
 

Makeup Tips: Nails

OPI's 'I'm Not Really a Waitress'    All you need to know about manicures and pedicures.

How to Give Yourself a Manicure: 30 Basic Tips
People notice your manicure. It's a fact of life I try to remember at all times because if I'm not careful I'll end up with fingernails at 5 different lengths and a hangnail or two. Here, I share 30 of my most favorite manicure (and pedicure) tips. Enjoy!

  1. The most flattering nail shape is not long or short or square, it's "squoval" -- not quite square and not quite oval. Get the look yourself by filing nails into a shape that mirrors the curve of your nail base. Square tips can make fingers look chubby, according to nail guru Deborah Lippmann in InStyle Magazine.
  2. To ensure your nails are the same length after filing, line each nail up with its counterpart.
  3. Don't shake the nail polish bottle, instead roll it between your palms. This mixes the polish without causing air bubbles.
  4. Before polishing clean nails, soak a cotton ball in nail polish remover and swipe across nails. This will remove any excess oils or soap than can cause peeling once polish is applied.
  5. One trick for applying nail polish: Hold the brush between the thumb and middle finger while resting your forefinger on the top of the cap.
  6. To get the best results, apply thin layers. Start with a thin layer of basecoat, then apply a thin layer of polish down the middle then one on the left and one on the right. After the first coat dries for a couple minutes, repeat, then follow with a thin layer of topcoat.
  7. Once your pedicure or manicure is complete, run an orangewood stick dipped in nail polish remover along either side of nail to fix any mistakes.
  8. Speed up the drying process by aiming a blow-dryer at toes (set on cool) for a minute at a time. Be sure to keep the dryer at least 12 inches from your feet.
  9. Gotta leave the house before your pedicure is dry? Apply cuticle oil over the polish. This will keep anything from sticking to your polish. See my list of the best cuticle creams.
  10. Stained nails? Remove the yellow easily by following the directions in How to Get Rid of Nail Stains.
  11. For an extra spa feeling to your home pedicure, nuke a damp towel in the microwave for a couple minutes, slather feet in moisturizer and wrap them in the warm towel.

    Best Makeup Products

      What's the best mascara? Foundation? Concealer? Get the scoop in this section BEFORE you buy.

    Foundation
      I have used Laura Mercier's tinted moisturizer for years and it's a beauty editor and beauty artist all-time favorite. It's lighter than foundation which makes it perfect for warmer days or for women who don't like heavy product on their faces. There are a bunch of shades to choose from, so I suggest heading to a department store and trying them out. You can use oil-free if you have oily skin or regular if you have dry or mature skin.
    Makeup artist Genevieve Herr explains on the awesome Website, xojane, how she uses it, "I usually apply with a wedge sponge that has been wet. I squeeze the water out so the sponge is damp -- so it goes on to the skin smoothly."

    Concealer
       A moist formula, such as Bobbi Brown's creamy concealer won't highlight fine lines and wrinkles, while still providing enough cover for dark circles.

    Primer
      A favorite among makeup junkies, this mineral primer is preservative-free and great for all skin types. Formulated to combat flaky, dry skin and rough patches, this primer also fills in fine lines and wrinkles providing a satin-like base for foundation. As a bonus, it's infused with soothing plant extracts, antioxidants and Vitamins C and E. Does not have parabens, sulfates, synthetic fragrances or dyes.
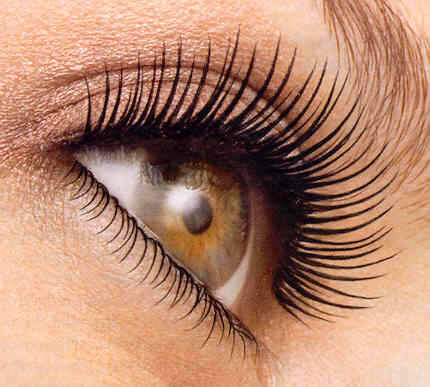
    Mascara
      Named the best mascara several years in a row in InStyle magazine's Best Beauty Buys issue, this Lancome Definicils not only lengthens lashes, but won't clump. I use it every day, having tried many mascaras. Keep in mind: Mascara is one beauty product you don't need to spend money on (see other best buys below). However, I happily spend the $20 or so this product costs.

    Hair Color


    If you're thinking of a hair color change, you've come to the right place. Here, you'll find the year's hottest hair color trends, gorgeous photo galleries, plus a ton of tricks and tips to help you find the shade perfectly tailored to you.
    Check out 5 Great Hair Color Choices to see gorgeous hair color and figure out which ones you're drawn to.

    My Favorite Hair Colors From Blonde, to Red, to Black (Highlights Included)
    20 Great Color Choices for HairWhether you go for bold red, rich brown or a glossy blonde, color can update any hairstyle and make you look fresh.
    This photo gallery shows off some of my favorite hair colors. You'll find more galleries within and instructions on how to get the exact color you're looking for. Plus, I've included 10 tips that just may help you find your own perfect color.


    Should You Get Blonde Highlights in Your Brown Hair?
    20 Great Color Choices for HairPeople usually associate highlights with blonde hair, but they work beautifully in brunette hair as well. Weaving in lighter washes of color into dark hair can help add definition and dimension.
    This amazing hair color on Katherine McPhee is a great example of ombré color (see photos of 20 Amazing Ombre Hairstyles). You can get this gradient effect with the balayage technique. Find out what balayage is in this article.
    If you love ombré color, you'll also love "bronde" hair color.


    Hair Color Tip No. 3: Bring Pictures to the Salon

    20 Great Color Choices for HairWhen getting your hair colored, it's best to bring pictures along. Just describing a color to your stylist won't always work because "Irish setter red" may mean something different to her than it does to you.
    Amy Huson, a colorist at the Marie Robinson salon, suggests in Allure magazine that you bring in 2 pictures to the salon, one that you love and one that you hate. "This way the colorist is sure to see -- not just hear -- what you want."
    This photo is of "Mad Men" actress Christina Hendricks, who admits she's dyed her naturally blonde hair red almost her entire adult life. 

    Hair Color Tip No. 4: Highlights Should be Multi-Dimensional

    20 Great Color Choices for HairThe best hair color is multi-dimensional, never one-dimensional. A great big wash of blonde is boring unless there are darker and lighter strands woven within. For a good example of natural hair color, look at a child's hair. You'll see many different colors.
    When getting your hair colored, ask your stylist to weave in up to 3 different types of colors if you're getting highlights. Ask for both highlights and lowlights. If you are getting all-over color, consider a few highlights around your face.

    Hair Color Tip No. 5: Bronde Hair is a Gorgeous Alternative for Brunettes

    20 Great Color Choices for Hair  If you have dirty blonde hair, you can perfect the "bronde" look -- a mix between blonde and brunette seen here. You simply get highlights and lowlights, keeping your "dirty brown bits" but adding in lighter colors for variation.
    This first photo is a terrific blend of brown and blond.

jeudi 28 juin 2012

Makeup Tips -- How to Apply Makeup

Our best makeup tips in one spot. Once you learn the basics, applying makeup isn't as daunting as it seems when you're standing in the midst of a makeup aisle. There are many tried-and-true tips and tricks that the experts know and we're sharing with you. Get these basics down, and you'll perfect a daytime and nighttime look.

Makeup Tips: Eyes

Makeup tips Your eyes are what people usually first notice about your appearance. Find out how to apply eyeliner, eyeshadow and mascara with these expert makeup tips and tricks.

How to Apply Mascara

 One question I get a lot from people is what mascara I use. I have somewhat small eyes and refuse to leave the house without mascara because the moment mascara is applied my eyes suddenly appear to be of normal size (I was blessed with long lashes, perhaps that helps). I even wore mascara in the 100 degree heat on a trip to Vietnam and my friend was blown away by the staying power of my Lancome Hypose mascara.

Makeup Tips: Eyebrows

Tweezerman Tweezers -- A Must-Have for Your Beauty Bag When a woman has perfectly shaped brows, she can look put together even without a drop of makeup. This is why brow-shaping should be the one weekly beauty regimen you should never skip. Get more eyebrow makeup tips.

  How to Pluck Your Brows

 Few things make you appear more groomed than well-plucked eyebrows . Many women have their eyebrows tweezed or threaded professionally and the trend is so hot, eyebrow boutiques are popping up in big cities across the country. I recommend you have a professional do your eyebrows first to set a 'blueprint', then all you have to do is pluck where the hairs grow in. (A pro waxing should set you back about $20 depending on where you live). Here's some tips on how to tweeze your own eyebrows. 

  Here's How:

  1. Cleanse your skin with a washcloth which naturally exfoliates the skin. If you want to go all out, use a facial scrub (see my list of the best facial scrubs). Worried about pain? You can actually apply Anbesol, Orajel or any teething gel for babies.
  2. Brush brows up and out with a clean toothbrush. I usually use my fingers.
  3. Situate yourself near a window with light pouring in or under a bright light with a good mirror (magnifying mirrors are best, but be sure and flip it over to see your overall effect in the regular mirror).
  4. Make sure you have a good pair of tweezers with a slanted edge (my favorite, hands down, are Tweezerman slanted tweezers (buy Tweezerman online). They last forever because the company will sharpen them for free.
  5. Tweeze hairs in the direction they grow. Don't grab too many hairs at a time. You can hold skin taut as you pluck.
  6. You can start anywhere, but I usually tweeze the area under my arch first, then I move above the brow and I clean up in between my brows last. It's a myth that brows should never be tweezed from above. You want both the bottoms and tops to be smooth. So be careful, but tweeze the top AND the bottom.
  7. The best brows have a slight arch. To find yours, take a long eyeshadow brush or pencil and hold it parallel to the outside edge of the colored part of your eye (the iris). Where the brush meets the brow is where the highest part of your brow should be. Tweeze the hairs underneath the arch.
  8. The space between your brows should be equal to, or a little wider than, your eyes. To find where your brow should go, take the brush or pencil and hold it parallel to the side of your nose. Where the brush meets your brow is where your brow should begin. Tweeze the strays in between.
  9. Stop every few hairs to step back and look at the job you're doing. If you overpluck, you're stuck. Unlike most hairs on your body, your brows won't always grow back once they're yanked.
  10. Once you're done plucking, you can apply aloe vera gel, which will calm the redness right away.

Makeup Tips: Lips

 So you weren't born with Angelina Jolie lips. Neither were we, but we can show you how to make your lips appear plumper (perhaps not THAT plump) with these makeup tips. Plus: Get the scoop on best glosses, lip balms (are they addictive?) and more.

  How to Get Rid of Scaly Lips

 If you suffer from scaly lips, a simple do-it-yourself trick to exfoliate them takes only a finger scoop of Vaseline and a toothbrush.
Step 1: Slather lips with petroleum jelly Step 2: Use a toothbrush to massage in the jelly in a circular motion. Step 3: Wipe off the excess petroleum jelly. 

  Makeup Tips: Face

How to Avoid Cake Face Even skin tone is your first priority (even over your eyes!). Find out how to choose and apply concealer and foundation with these makeup tips, then get the scoop on the proper blush application.

Top 10 Foundation Picks

Finding the best foundation for your complexion can be tricky. Your best bet is to go to a store like Sephora and try out a variety of products in your shade range. In the meantime, here's a rundown of my 13 favorite tried-and-true foundations.

   How to avoid "cake face"

 You know those women who wear so much foundation it looks like they have to remove it every night with a trawl?
That, dear readers, is a fine example of "cake face," wherein one slathers on too much foundation and concealer, the result being a pancake, mask-like makeup. If you have makeup covering every millimeter of your face, it's simply too much and the first thing people are going to think when they see you is, "She wears a lot of makeup." Why not play up, rather than cover up, your natural beauty?
The following are my best "how to avoid cake face" tips.

The Right Way to Wear Foundation & Concealer

In high school I wore a full face of Cover Girl foundation every day despite the fact that I had pretty nice skin for a 16-year-old. What I wish I knew then was that foundation is meant to cover up only your uneven spots like the cheeks, around the nose and maybe the chin. Once the foundation is in place, you can then dot concealer on any ruddy or pimply spots the foundation doesn't cover. Remember, with foundation, apply only on the spots that need it.